 admin1
No-Bake Chocolate Peanut Butter Bars: The Ultimate Easy, Creamy, and Crunchy Dessert Recipe
No-bake chocolate peanut butter bars are the perfect dessert for anyone who loves the rich taste of chocolate, the creamy goodness of peanut butter, and the satisfying sweetness of a homemade treat. These delicious bars have a smooth, buttery peanut filling, a rich chocolate topping, and a soft yet firm texture that makes every bite irresistible.
The best part is that you do not need an oven, complicated equipment, or advanced baking skills to make them. Everything comes together in a few simple steps, and your refrigerator does most of the work. Whether you are preparing a quick family dessert, making something special for guests, or looking for a sweet snack to enjoy throughout the week, these chocolate peanut butter bars are an excellent choice.
This recipe is designed to be easy to follow, even if you have never made a homemade dessert before. You will learn how to prepare the peanut butter base, create a glossy chocolate topping, achieve the perfect texture, and cut clean, beautiful bars without making a mess.
The ingredients are simple, the preparation is straightforward, and the results are wonderfully satisfying. Once you try this recipe, you may find yourself making it again and again.
Recipe Overview
- Preparation time: 20 minutes
- Chilling time: 2–3 hours
- Total time: Approximately 2 hours and 20 minutes to 3 hours and 20 minutes
- Cooking required: No baking; optional gentle melting on the stovetop or in a microwave
- Difficulty level: Easy
- Yield: 16 bars
- Serving size: One bar
- Storage: Refrigerate in an airtight container
These bars are ideal for preparing ahead of time because they need several hours to chill and set. You can make them in the morning for an evening dessert or prepare them the night before you plan to serve them.
What Makes No-Bake Chocolate Peanut Butter Bars So Special?
The appeal of these bars lies in their simple combination of textures and flavors. The bottom layer is rich, creamy, and slightly crumbly, with the familiar taste of peanut butter balanced by the sweetness of powdered sugar. The chocolate layer adds a smooth finish that contrasts beautifully with the softer filling.
Unlike traditional baked desserts, these bars do not depend on an oven to develop their structure. Instead, the ingredients come together through mixing, chilling, and setting. This makes them especially convenient during warm weather, when you do not want to heat up your kitchen.
Another reason to love this recipe is its flexibility. You can use milk chocolate for a sweeter dessert, dark chocolate for a deeper cocoa flavor, or a mixture of both to create a balanced topping. You can also adjust the thickness of the bars, add a pinch of salt, or include a little vanilla extract to enhance the flavor.
The recipe is also easy to prepare with children under adult supervision. They can help measure ingredients, stir the peanut butter mixture, and spread the chocolate topping. Since there is no baking involved, the process feels relaxed and enjoyable.
Most importantly, these bars taste like a combination of homemade peanut butter fudge and chocolate candy. They are rich enough to feel special but simple enough to make whenever a chocolate craving strikes.
Ingredients for No-Bake Chocolate Peanut Butter Bars
The following quantities make approximately 16 bars in an 8-by-8-inch square pan.
For the peanut butter layer
1 cup creamy peanut butter
Creamy peanut butter creates a smooth, rich base that holds the ingredients together. Regular commercial peanut butter is generally the easiest option because its consistency is stable. If you use natural peanut butter, stir it thoroughly before measuring because the oil can separate during storage.
1/2 cup unsalted butter, melted
Butter adds richness and helps the peanut butter mixture become firm when chilled. Unsalted butter is recommended because it allows you to control the saltiness of the finished dessert.
2 cups powdered sugar
Powdered sugar sweetens the peanut butter layer and gives it a soft, fudge-like consistency. Its fine texture makes it easier to mix into the butter and peanut butter without leaving noticeable sugar crystals.
1 teaspoon vanilla extract
Vanilla adds warmth and enhances the flavor of both the peanut butter and chocolate. Although optional, it makes the finished bars taste more rounded and dessert-like.
1/4 teaspoon fine salt
Salt balances the sweetness and brings out the roasted flavor of the peanuts. If your peanut butter is already quite salty, you can reduce this amount or leave it out.
For the chocolate topping
1 1/2 cups chocolate chips, approximately 255 grams
Milk chocolate chips create a sweet, creamy topping, while semisweet or dark chocolate chips provide a richer flavor. Choose according to your preference.
2 tablespoons creamy peanut butter
Adding a small amount of peanut butter to the chocolate helps create a smoother topping that is easier to slice after chilling. It also reinforces the peanut flavor throughout the dessert.
1 teaspoon neutral oil, optional
A little neutral oil, such as vegetable oil, can help the chocolate melt smoothly and spread more easily. Use it only if needed. Avoid adding water because even a small amount can cause melted chocolate to seize and become thick or grainy.
Equipment You Will Need
You do not need any special baking equipment for this recipe. A few basic kitchen tools are enough.
- An 8-by-8-inch square pan
- Baking parchment paper
- A medium mixing bowl
- A microwave-safe bowl or a small heatproof bowl
- A spatula or sturdy spoon
- Measuring cups and spoons, or a kitchen scale
- A sharp knife for cutting the chilled bars
Parchment paper is particularly helpful because it allows you to lift the entire dessert out of the pan once it has set. This makes cutting and serving much easier.
If you do not have an 8-by-8-inch pan, you can use a similar-sized container. A larger pan will produce thinner bars, while a smaller container will create thicker bars that may require additional chilling time.
Step-by-Step Instructions
Step 1: Prepare the Pan
Begin by preparing your square pan before mixing any ingredients.
Line the bottom and sides of the pan with parchment paper, leaving some paper hanging over two opposite edges. These extra pieces will act as handles, allowing you to lift the chilled dessert out of the pan later.
Press the parchment into the corners as neatly as possible. If it keeps curling upward, you can lightly crease it to help it stay in place.
Set the prepared pan aside.
This small step may seem unimportant, but it makes a noticeable difference when you are ready to remove and slice the bars. Without parchment paper, the peanut butter layer can stick to the bottom of the pan, making it difficult to serve neat portions.
Step 2: Melt the Butter
Place the unsalted butter in a microwave-safe bowl and heat it until completely melted.
For best results, heat it in short intervals of approximately 15–20 seconds, checking and stirring between intervals. The butter should be liquid but does not need to be extremely hot.
You can also melt the butter in a small saucepan over low heat. Remove it from the stove as soon as it has melted.
Allow the butter to cool for a minute or two before combining it with the peanut butter. Very hot butter is not necessary and can make the mixture unnecessarily greasy.
Step 3: Mix the Peanut Butter and Butter
Add the creamy peanut butter to the melted butter.
Stir slowly with a spatula or spoon until the two ingredients are thoroughly combined. The mixture should look smooth, glossy, and uniform, with no visible streaks of unmixed butter.
If the peanut butter is especially thick, continue stirring gently until it softens and blends into the melted butter.
Next, add the vanilla extract and salt. Mix again until everything is evenly distributed.
At this stage, the mixture should have a rich peanut aroma and a smooth consistency. Do not worry if it appears slightly loose. The powdered sugar will thicken it in the next step.
Step 4: Add the Powdered Sugar
Gradually add the powdered sugar to the peanut butter mixture.
It is best to add it in two or three portions rather than all at once. Stir after each addition so that the sugar becomes evenly incorporated.
At first, the mixture may appear thick and slightly sticky. As more powdered sugar is added, it should become denser and easier to press into the pan.
Continue mixing until there are no large pockets of dry sugar remaining. The finished mixture should resemble a soft, thick dough.
If you prefer a very smooth texture, sift the powdered sugar before adding it. This helps remove lumps and makes mixing easier.
The consistency is important. The mixture should be firm enough to hold its shape when pressed, but not so dry that it crumbles excessively.
If the mixture feels unusually wet, add a little more powdered sugar, one tablespoon at a time. If it seems too dry and crumbly, add a small amount of peanut butter and mix again.
Make adjustments gradually. A small change can be enough to bring the mixture to the right consistency.
Step 5: Press the Peanut Butter Mixture into the Pan
Transfer the peanut butter mixture into the parchment-lined pan.
Use a spatula or the back of a spoon to spread it toward the corners. Press the mixture firmly and evenly across the bottom of the pan.
For a particularly neat finish, place another piece of parchment paper over the mixture and gently press it with your hands or the flat bottom of a measuring cup. Remove the top piece of parchment when the surface is level.
Try to keep the thickness consistent from edge to edge. An uneven base can result in bars with different textures and uneven chocolate coverage.
Pay special attention to the corners because the mixture may collect more thickly in these areas.
Once the peanut butter layer is smooth and compact, place the pan in the refrigerator for approximately 15–20 minutes while you prepare the chocolate topping.
This short chilling period helps the base become more stable and prevents it from mixing too easily with the warm chocolate.
Step 6: Melt the Chocolate
Place the chocolate chips and two tablespoons of peanut butter in a clean, microwave-safe bowl.
Microwave the mixture in 20-second intervals, stirring thoroughly after each interval. Continue until the chocolate is mostly melted.
At that point, stir slowly until the remaining pieces melt from the residual heat. This approach reduces the risk of overheating the chocolate, which can make it thick, grainy, or unpleasantly stiff.
If you prefer to use the stovetop, place the chocolate chips and peanut butter in a heatproof bowl set over a saucepan containing gently simmering water. Make sure the bottom of the bowl does not touch the water.
Stir continuously until the mixture becomes smooth.
Keep water and steam away from the chocolate as much as possible. Water can cause melted chocolate to seize, turning it into a thick paste instead of a smooth topping.
If the chocolate seems too thick to spread, stir in up to one teaspoon of neutral oil.
The finished topping should be glossy and pourable, with a consistency that allows it to spread easily over the peanut butter layer.
Let it cool briefly before pouring it over the chilled base. It should remain fluid but should not be so hot that it softens the peanut butter mixture excessively.
Step 7: Spread the Chocolate Topping
Remove the pan from the refrigerator.
Pour the melted chocolate mixture over the peanut butter layer. Use a spatula to spread it gently toward all four corners.
Try to create an even chocolate layer without pressing too hard. Excessive pressure can disturb the peanut butter base and pull crumbs into the topping.
If you want a perfectly smooth finish, gently tilt the pan from side to side to encourage the chocolate to level itself.
You can also tap the pan lightly against the countertop once or twice to help release small air bubbles. Avoid tapping too forcefully, as this may disturb the layers.
At this point, the dessert should have a solid-looking peanut butter base and a smooth chocolate surface.
For an attractive homemade appearance, you can leave the top completely plain. Alternatively, before chilling, lightly drag the tip of a knife across the chocolate to create a subtle decorative pattern.
Keep any decoration simple if you want the bars to have a clean, classic appearance.
Step 8: Chill Until Firm
Place the pan in the refrigerator for approximately 2 hours, or until the chocolate topping and peanut butter base have set firmly.
The exact chilling time may vary depending on the temperature of your refrigerator, the thickness of the layers, and the type of chocolate used.
Avoid moving the pan repeatedly while the topping is setting. Keeping it level will help the chocolate form an even surface.
After about two hours, gently check the center of the dessert. The top should feel firm to a light touch, and the base should hold together when pressed gently near an edge.
If the chocolate still feels soft or the center seems loose, return the pan to the refrigerator for another 30–60 minutes.
Do not rush this stage. Proper chilling is one of the most important factors in producing bars that hold their shape when cut.
Although freezing can speed up the process, refrigeration generally gives the layers a more even texture and makes it easier to avoid an overly hard chocolate topping.
Step 9: Remove the Bars from the Pan
Once the dessert is completely set, use the parchment paper overhangs to lift it out of the pan.
Place the slab on a clean cutting board.
If the parchment sticks slightly to the sides, gently peel it away rather than pulling forcefully. The chilled dessert should release without much difficulty.
Allow the slab to stand at room temperature for approximately 5–10 minutes before cutting, especially if the chocolate is very firm.
This brief resting period can help reduce cracking and make slicing easier.
Step 10: Cut into Neat Bars
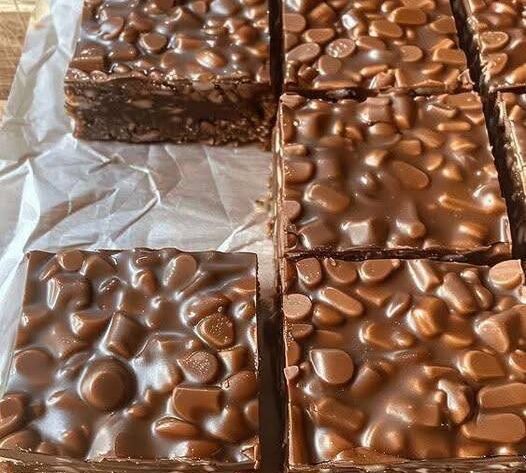
Use a large, sharp knife to cut the slab into 16 bars.
For a standard 8-by-8-inch pan, first cut the slab into four equal strips in one direction, then cut each strip into four pieces in the other direction.
For cleaner edges, warm the knife under hot water, wipe it completely dry, and make a cut. Repeat as necessary, cleaning the blade between cuts.
Always dry the knife before it touches the chocolate. Water can affect the chocolate surface, and a wet blade may leave an untidy finish.
Press the knife down steadily instead of using a heavy sawing motion. If the chocolate cracks, allow the bars to warm slightly longer before continuing.
Once cut, transfer the bars to a serving plate or an airtight storage container.
Your no-bake chocolate peanut butter bars are now ready to enjoy.
Tips for Perfect No-Bake Chocolate Peanut Butter Bars
A recipe with so few ingredients may seem foolproof, but a few small details can make the difference between bars that slice beautifully and bars that crumble or become too soft.
Use the Right Peanut Butter
Creamy commercial peanut butter is the most reliable option for this recipe. It usually has a consistent texture that blends easily with melted butter and powdered sugar.
Natural peanut butter can also work, but its oil content may vary considerably. If the mixture becomes oily or too loose, the bars may not hold together as well.
If you prefer natural peanut butter, stir it thoroughly before measuring and check the consistency of the mixture before pressing it into the pan.
Measure the Powdered Sugar Carefully
Too little powdered sugar can leave the peanut butter layer soft and difficult to slice. Too much can make it dry and crumbly.
For the most consistent results, measure the sugar carefully or weigh it. Different brands and measuring techniques can produce different amounts in the same measuring cup.
Add the sugar gradually and pay attention to the texture rather than relying only on the quantity.
Avoid Overheating the Chocolate
Chocolate melts best when heated gently. High heat can cause it to scorch, become grainy, or lose its smooth texture.
Use short microwave intervals and stir frequently. Remember that chocolate continues melting after it is removed from the microwave, so you do not need to wait until every chip has completely melted before stirring.
Chill the Base Before Adding Chocolate
A slightly chilled peanut butter layer provides a more stable surface for the topping.
If the base is too soft, the chocolate may blend into it when poured. A short refrigeration period helps preserve the distinction between the two layers.
Let the Bars Warm Slightly Before Slicing
Very cold chocolate can be brittle, particularly if you use dark chocolate with a high cocoa content.
Letting the slab stand for several minutes before cutting reduces the chance of cracking. A warm, dry knife also helps produce cleaner edges.
Do Not Skip the Final Chilling Period
The bars may look ready before the center has fully set. Cutting them too soon can cause the peanut butter layer to shift or the chocolate topping to smear.
Give the dessert enough time to firm up completely before slicing.
Delicious Variations to Try
Once you have mastered the basic recipe, you can adapt it to suit different tastes and occasions.
Dark Chocolate Peanut Butter Bars
Replace the milk chocolate chips with dark chocolate chips containing approximately 60–70% cocoa.
The darker chocolate adds a slightly bitter, intense flavor that balances the sweetness of the peanut butter base. This version is ideal for people who prefer desserts that are rich without being excessively sweet.
You may want to add a small pinch of salt to the topping to make the chocolate flavor more pronounced.
Extra-Creamy Peanut Butter Bars
For an especially smooth filling, use creamy peanut butter and sifted powdered sugar.
Mix the ingredients thoroughly, but avoid adding excessive liquid. The filling should remain thick enough to hold its shape after chilling.
You can also allow the bars to sit at room temperature briefly before serving, which softens the peanut butter layer slightly.
Crunchy Peanut Butter Bars
If you enjoy a little texture, replace half of the creamy peanut butter with crunchy peanut butter.
The small peanut pieces add a pleasant crunch and make the bars feel more substantial.
Alternatively, fold two or three tablespoons of finely chopped roasted peanuts into the prepared filling before pressing it into the pan.
Chocolate Peanut Butter Bars with Sea Salt
For a sweet-and-salty variation, sprinkle a small amount of flaky sea salt over the chocolate topping before refrigerating.
Use the salt sparingly because the peanut butter may already contain salt. The goal is to enhance the flavor, not make the dessert noticeably salty.
This variation works especially well with semisweet or dark chocolate.
Peanut Butter Bars with a Biscuit Base
If you prefer a firmer, more cookie-like texture, you can add approximately 1/2 cup of finely crushed plain digestive biscuits or graham crackers to the peanut butter mixture.
Mix thoroughly and check the consistency. The crumbs absorb moisture, so you may need a little extra peanut butter if the mixture becomes too dry.
This variation changes the original texture slightly but creates a satisfying, crumbly base.
Mini Chocolate Peanut Butter Bites
Instead of making one large slab, divide the peanut butter mixture among small paper-lined muffin cups.
Press the mixture into the bottom of each cup, add a spoonful of melted chocolate, and refrigerate until firm.
The result is a collection of individual treats that are convenient for parties, dessert platters, and lunch boxes.
Because the portions are smaller, check them earlier during chilling.
Common Problems and How to Fix Them
Why Is the Peanut Butter Layer Too Soft?
A soft filling can result from using very oily peanut butter, adding too little powdered sugar, or not allowing enough time for chilling.
To fix the problem before adding the chocolate, gradually mix in more powdered sugar until the filling becomes thick enough to press into the pan.
If the bars have already been assembled, refrigerate them for longer. If they remain too soft, place them in the freezer for approximately 15–20 minutes before cutting.
For future batches, measure the ingredients carefully and use peanut butter with a consistent texture.
Why Does the Peanut Butter Layer Crumble?
A crumbly base usually means there is too much powdered sugar relative to the fat in the mixture.
Add a little peanut butter, approximately one teaspoon at a time, and mix until the filling becomes cohesive. If you have not yet pressed it into the pan, this adjustment is easy to make.
Avoid adding large amounts of liquid because it can interfere with the texture and storage quality.
Why Is the Chocolate Topping Cracking?
Chocolate can crack when it is extremely cold or when the bars are cut with a dull knife.
Allow the slab to rest at room temperature for several minutes before slicing. Use a sharp knife warmed with hot water and dried thoroughly.
Adding the recommended peanut butter to the chocolate topping also helps make it less brittle than plain melted chocolate.
Why Is the Chocolate Thick and Grainy?
This often happens when chocolate overheats or comes into contact with water.
If the chocolate has simply become too thick from cooling, gentle reheating and careful stirring may restore its consistency. However, if it has seized because of water contamination or become scorched, it may not return to a smooth texture suitable for this topping.
Always use a completely dry bowl and utensils, and heat the chocolate slowly.
Why Are the Layers Mixing Together?
The chocolate may have been too hot when poured over the filling, or the peanut butter base may not have chilled long enough.
Let the melted chocolate cool briefly and refrigerate the peanut butter layer before adding the topping.
Spread the chocolate gently rather than pressing the spatula firmly against the base.
How to Store No-Bake Chocolate Peanut Butter Bars
Proper storage keeps these bars fresh, flavorful, and easy to serve.
Refrigeration
Place the bars in an airtight container and store them in the refrigerator.
They generally keep well for approximately one week when refrigerated properly. For the best texture and flavor, keep them covered and avoid leaving them uncovered for long periods.
If you need to stack the bars, place parchment paper between the layers to prevent sticking.
These bars are best served slightly cool. If you prefer a softer filling, let a portion stand at room temperature for approximately 5–10 minutes before eating.
Because the recipe contains butter and peanut butter, refrigeration is the most practical storage method.
Freezing
These bars can also be frozen for longer storage.
Arrange the cut bars in a single layer on a tray and freeze until firm. Transfer them to a freezer-safe airtight container, separating layers with parchment paper.
For the best quality, use them within approximately two months.
When you want to serve them, transfer the desired number of bars to the refrigerator and allow them to thaw gradually. You can also let them stand briefly at room temperature before eating.
Avoid repeatedly thawing and refreezing the entire batch. Instead, freeze individual portions so that you can take out only what you need.
Serving Ideas for Every Occasion
No-bake chocolate peanut butter bars are versatile enough for casual snacking and special gatherings.
For a simple family dessert, serve them directly from the refrigerator with tea, coffee, or a glass of cold milk.
For a party, arrange the bars on a serving platter and cut them into smaller squares. Their rich flavor makes bite-sized portions particularly appealing after a large meal.
You can also serve a bar alongside vanilla ice cream for a more indulgent dessert. The contrast between the cold ice cream and the peanut butter filling creates a satisfying combination.
For a dessert table, pair the bars with fresh strawberries, banana slices, or other fresh fruit. The fruit provides a refreshing contrast to the richness of the chocolate and peanut butter.
If you are preparing a homemade gift, place the chilled bars in a food-safe container with parchment paper between the layers. Keep them refrigerated until they are ready to be transported or served.
Remember that these bars contain peanuts and may contain other allergens depending on the chocolate and peanut butter brands you choose. Clearly identify the ingredients when serving guests, and keep them away from anyone with a peanut allergy.
Are No-Bake Chocolate Peanut Butter Bars Suitable for Beginners?
Absolutely. This recipe is particularly suitable for beginners because it does not require baking techniques, yeast, eggs, or complicated temperature control.
You do not need to worry about a cake sinking in the center, cookies spreading too much in the oven, or a dessert burning while you are preparing another dish.
The main skills involved are measuring, stirring, spreading, melting chocolate gently, and allowing the dessert to chill.
Even if the first batch does not look perfectly polished, the flavor should still be delicious as long as the ingredients are measured reasonably accurately and the chocolate is melted without overheating.
For the best first attempt, follow the recipe as written before experimenting with different ingredients. Once you understand how the peanut butter base should feel and how the chocolate topping should behave, you can confidently make adjustments.
Frequently Asked Questions
Can I make these bars without a microwave?
Yes. Melt the butter in a small saucepan over low heat. For the chocolate, use a heatproof bowl placed over a saucepan of gently simmering water. Stir until smooth, keeping water and steam away from the chocolate.
Can I use milk chocolate instead of dark chocolate?
Yes. Milk chocolate produces a sweeter topping with a creamier flavor. If you prefer a less sweet dessert, semisweet or dark chocolate is a better choice.
Can I make these bars a day ahead?
Yes. Preparing them a day ahead is an excellent idea because the layers have plenty of time to set. Store them in an airtight container in the refrigerator until you are ready to serve.
Can I use crunchy peanut butter?
Yes. Crunchy peanut butter adds texture and a more noticeable roasted peanut flavor. The filling may be slightly less smooth, but the recipe still works well.
Do I need to grease the pan?
Not if you line it properly with parchment paper. The parchment helps prevent sticking and makes removing the chilled slab easier.
Can I reduce the sugar?
You can experiment with using less powdered sugar, but doing so will change the texture as well as the sweetness. The sugar helps the peanut butter layer become firm, so reducing it too much may result in softer bars.
If you want a less sweet dessert, using dark chocolate is generally the easiest adjustment.
Can I make the bars without butter?
Butter provides richness and helps the peanut butter layer set. Replacing it requires a different formulation, so the texture may not be identical. For the most reliable results, follow the listed ingredients.
How do I know when the bars are ready to cut?
The chocolate should be firm, and the peanut butter layer should hold its shape when you lift the slab from the pan. If the center feels soft or shifts when pressed gently, refrigerate the dessert for longer.
Can I use a loaf pan instead of a square pan?
Yes. A loaf pan can work if it has sufficient capacity, but the bars will be thicker and may require additional chilling time. You may also find it easier to make fewer, larger portions.
Can I leave the bars at room temperature?
They can be left out briefly for serving, but they should not be kept at room temperature for extended periods, especially in a warm kitchen. Refrigeration helps preserve their texture and keeps the butter-based filling firm.