Chocolate Coconut Bars are one of those timeless no-bake desserts that combine minimal ingredients with maximum flavor. Known for their soft, chewy coconut center and smooth chocolate coating, these bars are popular across home kitchens, bakeries, and dessert lovers worldwide. Whether you’re searching for an easy coconut dessert, a quick chocolate snack, or a homemade sweet treat for tea time, this recipe fits perfectly into every category.
The beauty of this recipe lies in its simplicity. With just a handful of pantry staples—coconut, condensed milk, vanilla, and chocolate—you can create a rich dessert that feels indulgent but requires very little effort. This makes it an ideal choice for beginners, busy families, or anyone craving something sweet without turning on the oven.
In this detailed guide, you will learn not just how to make chocolate coconut bars, but also understand the texture, technique, variations, storage tips, and pro tricks to make them taste like professional bakery-style desserts.
Why These Coconut Chocolate Bars Are So Popular
Homemade coconut bars have gained popularity in recent years due to the rise of no-bake desserts and quick recipes. There are several reasons why this recipe stands out:
- No baking required – perfect for hot weather or quick preparation
- Minimal ingredients – only a few pantry staples needed
- Quick setting time – ideal for last-minute desserts
- Kid-friendly recipe – safe and fun for family cooking
- Perfect texture balance – chewy coconut center with smooth chocolate coating
These bars are often compared to commercial chocolate-coconut candy bars, but homemade versions taste fresher and allow full control over sweetness and quality.
Understanding the Core Ingredients and Their Role
Every ingredient in this recipe plays a specific role in achieving the perfect texture and flavor.
Shredded Coconut (2 cups)
Coconut is the star ingredient. It provides structure, chewiness, and natural sweetness. You can use either sweetened or unsweetened shredded coconut depending on your preference. Unsweetened coconut gives a more natural, slightly nutty flavor, while sweetened coconut results in a dessert-like richness.
Sweetened Condensed Milk (1 cup)
This is the binding and sweetening agent. It holds the coconut together and gives the bars their soft, fudgy consistency. It also adds creaminess, eliminating the need for additional sugar or butter.
Vanilla Extract (1 tsp, optional)
Vanilla enhances the overall aroma and flavor. While optional, it adds warmth and depth to the coconut mixture, making the bars more aromatic and dessert-like.
Chocolate Coating (200–300 g)
Chocolate is what transforms this simple coconut mixture into a luxurious dessert bar. You can use dark chocolate for a slightly bitter contrast or milk chocolate for a sweeter taste. When melted and set, it forms a smooth shell around the coconut filling.
Texture Science: What Makes These Bars Work
The success of chocolate coconut bars depends on balancing moisture and structure. The condensed milk provides enough liquid to bind the coconut flakes, while the coconut absorbs the moisture and becomes firm enough to shape. Once chilled, the mixture solidifies without becoming dry.
The chocolate layer acts as a protective shell, locking in moisture while adding a satisfying snap when bitten.
Step-by-Step Preparation Strategy (Before You Start Cooking)
Before you begin mixing, it’s important to prepare your workspace:
- Line a tray or baking dish with parchment paper
- Have all ingredients measured in advance
- Keep a spatula or spoon ready for mixing
- Prepare a double boiler or microwave-safe bowl for melting chocolate
Preparation ensures smooth workflow and prevents the mixture from drying out before shaping.
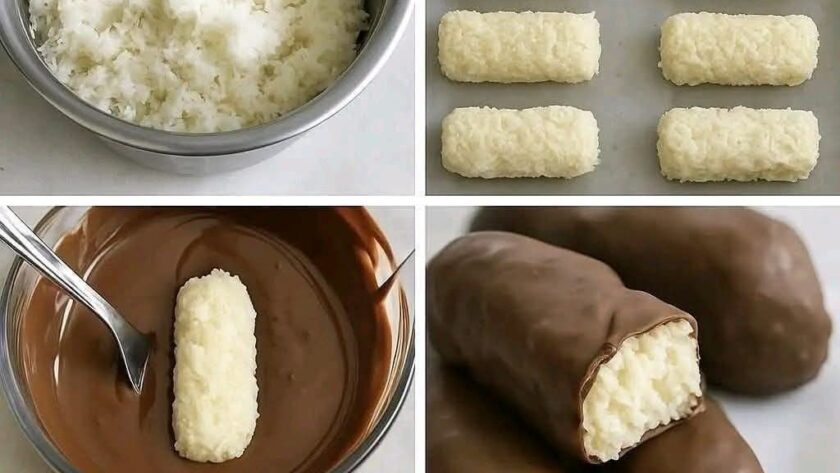
Mixing the Coconut Filling for Perfect Consistency
The coconut filling is the heart of this recipe. The goal is to achieve a thick, moldable mixture that holds shape when pressed.
Start by adding shredded coconut into a large mixing bowl. Pour in the sweetened condensed milk gradually, mixing as you go. This ensures even distribution and prevents clumping. Add vanilla extract if using.
Continue mixing until the mixture becomes sticky and thick. When pressed between your fingers, it should hold together without falling apart.
If the mixture feels too dry, a small extra spoon of condensed milk can be added. If too wet, a little more coconut can balance it.
Shaping the Coconut Base Like a Professional Dessert
Once your mixture is ready, transfer it into the lined tray. Press it firmly using a spatula or the back of a spoon. Compacting is important because it ensures the bars will not crumble later.
Try to create an even layer with uniform thickness. This helps when cutting later and ensures consistent texture in every bite.
After shaping, place the tray in the refrigerator for 30–60 minutes. This step helps the mixture firm up before adding chocolate.
Melting Chocolate Smoothly Without Burning
Melting chocolate correctly is crucial for a glossy finish.
You can melt chocolate using:
- Double boiler method – Place chocolate in a heatproof bowl over simmering water
- Microwave method – Heat in short 20–30 second intervals, stirring each time
Avoid overheating, as chocolate can become grainy or burn easily. Stir continuously until smooth and silky.
Coating Technique for a Professional Finish
Once the coconut base is firm, remove it from the fridge and cut into bars or squares.
Dip or pour melted chocolate over each piece, ensuring full coverage. You can also pour chocolate over the entire slab and spread it evenly for a thick coating.
Place the coated bars back into the fridge for 15–30 minutes until the chocolate sets completely.
Expert Tips for Better Chocolate Coconut Bars
- Press coconut mixture firmly to avoid crumbling
- Chill before cutting for clean edges
- Use high-quality chocolate for better taste
- Add a pinch of salt if you want a sweet-salty balance
- Store in a cool place to prevent melting
Storage and Shelf Life
These coconut chocolate bars store very well, making them ideal for meal prep or gifting.
- Refrigerator: up to 7–10 days
- Freezer: up to 2 months
Always store in an airtight container to maintain freshness and prevent moisture absorption.
Serving Suggestions
Chocolate coconut bars can be enjoyed in many ways:
- With hot tea or coffee
- As a lunchbox treat
- As a party dessert platter item
- As a homemade gift wrapped in parchment paper
They also pair well with nuts, caramel drizzle, or sea salt flakes for gourmet variations.
Variations You Can Try
While the classic version is perfect on its own, you can customize it:
- Add chopped almonds or cashews for crunch
- Use white chocolate for a sweeter version
- Sprinkle cocoa powder for a double chocolate effect
- Add orange zest for a citrus twist
Common Mistakes to Avoid
- Using too much condensed milk (makes mixture runny)
- Not chilling before cutting (causes crumbling)
- Overheating chocolate (causes dull texture)
- Skipping parchment paper (makes removal difficult)
Final Thoughts on This Easy Coconut Dessert
Chocolate Coconut Bars are a perfect example of how simple ingredients can create an extraordinary dessert. With minimal effort, you get a rich, chewy, chocolate-coated treat that satisfies sweet cravings instantly. Whether you’re preparing them for family, guests, or personal indulgence, they always deliver consistent results.
This recipe is beginner-friendly, cost-effective, and highly customizable, making it a must-have in your dessert collection.
Source
Inspired by traditional homemade coconut confectionery and classic no-bake chocolate bar recipes commonly used in home baking and dessert preparation worldwide.
Part 2: Simple Recipe Card Version
Chocolate Coconut Bars (Quick Method)
Ingredients:
- 2 cups shredded coconut (unsweetened or sweetened)
- 1 cup sweetened condensed milk
- 1 tsp vanilla extract (optional)
- 200–300 g chocolate (dark or milk chocolate, melted)
Instructions:
- Mix shredded coconut, condensed milk, and vanilla in a bowl until thick and sticky.
- Press mixture into a lined tray evenly.
- Chill for 30–60 minutes.
- Cut into bars or squares.
- Melt chocolate and coat each piece or pour over the top.
- Refrigerate until chocolate is fully set.
- Serve chilled or at room temperature.