There is something deeply comforting about the aroma of freshly baked artisan bread filling the kitchen. A warm loaf with a crisp golden crust, soft airy interior, and fragrant herbs instantly transforms an ordinary meal into something memorable. This rustic rosemary artisan bread is designed for home bakers who want bakery-style bread without complicated techniques or professional equipment.
This easy no-knead bread recipe combines simple pantry staples with fresh rosemary to create a flavorful homemade loaf that looks and tastes like it came from an artisan bakery. The beauty of this recipe lies in its simplicity. There is no intensive kneading, no fancy mixers, and no complicated shaping methods. Instead, time and hydration do most of the work, producing a chewy crumb and crispy crust that bread lovers crave.
Homemade artisan bread has become increasingly popular because people want healthier, fresher, and more flavorful baked goods. Unlike store-bought loaves filled with preservatives and artificial ingredients, this rustic herb bread uses basic natural ingredients to create rich flavor and beautiful texture. The long fermentation process develops complexity and depth while keeping the recipe beginner-friendly.
Fresh rosemary adds earthy aroma and savory character to every slice. Combined with olive oil, soups, cheeses, or butter, this crusty bread becomes the centerpiece of any table. Whether served beside pasta, roasted meats, tomato soup, or a charcuterie board, rosemary bread delivers rustic comfort with gourmet appeal.
One of the greatest advantages of this homemade Dutch oven bread is the texture. The high-moisture dough creates large air pockets inside the loaf while the steam trapped inside the covered pot forms an irresistibly crunchy crust. This method mimics professional steam ovens used in artisan bakeries, allowing home bakers to achieve bakery-quality results using a regular kitchen oven.
The foundation of this recipe starts with flour. All-purpose flour works beautifully for a soft yet structured loaf, while bread flour creates a chewier texture thanks to its higher protein content. Bread flour is ideal if you enjoy classic artisan-style chewiness. Some bakers even combine both flours for balanced texture and flavor.
Salt is another essential ingredient that should never be underestimated. Beyond enhancing flavor, salt strengthens the gluten structure and improves overall dough performance. Kosher salt or sea salt are excellent choices because they dissolve evenly and contribute clean flavor to the bread.
Instant yeast keeps the process simple and efficient. Unlike active dry yeast, instant yeast can be mixed directly into the dry ingredients without proofing first. However, active dry yeast can still be used successfully if dissolved in warm water before mixing. The slow fermentation process allows the yeast to work gradually, creating exceptional flavor and airy texture.
Warm water activates the yeast and hydrates the flour. Maintaining proper water temperature is important because water that is too hot can damage yeast, while cold water slows fermentation significantly. Ideally, the water should feel warm but comfortable to the touch.
Fresh rosemary is the signature ingredient that elevates this bread from ordinary to extraordinary. Finely chopped rosemary disperses evenly throughout the dough, giving each bite aromatic herbal flavor. Dried rosemary may also be used when fresh herbs are unavailable, though fresh rosemary provides brighter flavor and stronger fragrance.
For bakers who enjoy experimenting, several optional additions can personalize this loaf even further. Fresh thyme enhances the herbal profile and pairs beautifully with rosemary. Kalamata olives introduce a savory Mediterranean twist with salty richness. Parmesan cheese contributes nutty depth and subtle umami flavor, while roasted garlic adds sweetness and complexity that make the bread irresistible.
The no-knead technique is what makes this recipe approachable for bakers of all skill levels. Traditional bread recipes often require extensive kneading to develop gluten structure, but this method relies on time instead of physical labor. As the dough rests and ferments, gluten develops naturally, creating elasticity and strength without effort.
Mixing the dough takes only a few minutes. Dry ingredients are combined in a large bowl before warm water is added. The dough will appear rough, shaggy, and sticky, which is completely normal. Many beginner bakers worry their dough looks too wet, but high hydration is actually the secret to airy artisan bread.
After mixing, the dough undergoes its first rise. During this resting period, yeast ferments the dough, producing carbon dioxide that creates bubbles and volume. The dough should roughly double in size and appear lively with visible air pockets. Depending on room temperature, this may take two to three hours.
Longer fermentation dramatically improves flavor. Allowing the dough to rest overnight in the refrigerator creates deeper, more developed taste similar to bakery sourdough breads. Cold fermentation also improves texture and makes the dough easier to handle.
Shaping artisan bread requires a gentle touch. Unlike sandwich bread, this dough should not be aggressively punched down or heavily kneaded after rising. Preserving the trapped air bubbles helps maintain the open crumb structure that defines rustic artisan bread.
A bench scraper or spatula is useful for handling sticky dough. Lightly flouring the work surface prevents sticking while keeping additional flour to a minimum. Excess flour can make the bread dense and dry.
The second rise allows the shaped dough to become light and puffy before baking. Resting the dough on parchment paper makes transferring it into the hot Dutch oven much safer and easier. During this stage, the dough relaxes and expands further, creating ideal oven spring during baking.
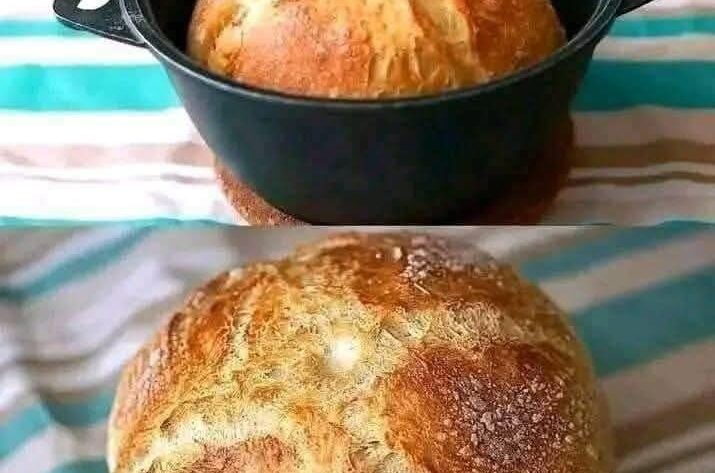
Preheating the Dutch oven is one of the most important steps in the entire process. A thoroughly heated Dutch oven instantly creates steam when the dough is placed inside. This steam keeps the crust flexible during the early baking stage, allowing maximum expansion and creating the signature crispy artisan crust.
Scoring the dough before baking is both decorative and functional. Shallow cuts on the surface help control expansion while creating rustic visual appeal. A sharp knife, razor blade, or bread lame works best for scoring.
The baking process occurs in two stages. First, the loaf bakes covered, trapping steam inside the Dutch oven. This produces rapid expansion and moisture retention. Then the lid is removed, allowing the crust to brown deeply and develop crunchiness.
The finished loaf should have rich golden color and sound hollow when tapped on the bottom. Cooling the bread completely before slicing is crucial because the interior continues setting as steam redistributes throughout the loaf. Cutting too early may result in gummy texture.
This rosemary artisan bread offers endless serving possibilities. It pairs wonderfully with extra virgin olive oil and balsamic vinegar for dipping. Soft butter and flaky sea salt create a simple yet luxurious snack. The bread also complements creamy soups, hearty stews, pasta dishes, and roasted vegetables beautifully.
For breakfast, toasted slices topped with avocado, eggs, or cream cheese become hearty and flavorful. The rosemary aroma intensifies slightly when toasted, making leftovers especially delicious. Thick slices also make excellent sandwiches and paninis.
Storage matters when preserving artisan bread quality. Because homemade bread contains no preservatives, proper storage helps maintain texture and freshness. Wrapping the loaf in a clean kitchen towel or storing it in a paper bag preserves crust crispness better than plastic, which traps moisture and softens the crust.
Freezing is an excellent option for long-term storage. The loaf can be frozen whole or sliced for convenience. Wrapping tightly in plastic wrap followed by foil helps prevent freezer burn. When ready to eat, thaw at room temperature and reheat briefly in the oven for fresh-baked texture.
Reheating restores crispness beautifully. A few minutes in the oven revives the crust while warming the interior. Toasting slices individually is another excellent way to enjoy leftover bread.
Many home bakers encounter common bread-making concerns during their first attempts. Sticky dough is often misunderstood but is actually desirable in artisan bread recipes. Wet dough creates lighter texture and larger air pockets. Using lightly wet hands or a dough scraper helps manage stickiness without adding excessive flour.
If the bread fails to rise properly, inactive yeast or cool room temperature may be responsible. Fresh yeast and a warm environment encourage healthy fermentation. Positioning the dough near a slightly warm oven or sunny window can help during colder months.
Although a Dutch oven produces the best crust, alternative methods can still create excellent bread. Baking on a heavy sheet pan with a tray of hot water in the oven generates steam that improves crust development.
Creative variations make this recipe endlessly adaptable. Rosemary olive bread offers Mediterranean flavor ideal for serving with cheeses and wine. Garlic rosemary bread delivers savory richness perfect for pasta nights. Parmesan rosemary bread adds cheesy depth that pairs wonderfully with soups and salads.
Whole wheat flour can also be incorporated for added nutrition and nutty flavor. Replacing a portion of the white flour with whole wheat flour creates heartier texture while maintaining softness. Slightly increasing water helps compensate for whole wheat flour’s greater absorption.
Homemade rosemary artisan bread represents more than just baking. It brings warmth, tradition, and creativity into the kitchen. The process itself becomes therapeutic, from mixing ingredients to hearing the crust crackle as the loaf cools.
Baking bread at home also allows complete control over ingredients and flavor. You can customize herbs, cheeses, and seasonings while avoiding unnecessary additives found in commercial loaves. The result is wholesome, flavorful bread crafted exactly to your preference.
This rustic no-knead rosemary bread is ideal for beginner bakers yet impressive enough for experienced cooks. Its crisp crust, airy crumb, and aromatic herbs make it a timeless recipe worth repeating again and again. Once you experience homemade artisan bread fresh from the oven, it quickly becomes a kitchen tradition you will return to for years.
Part 2: Easy Rustic Rosemary Artisan Bread Recipe
Ingredients
| Ingredient | Amount | Notes |
|---|---|---|
| All-purpose flour or bread flour | 3 cups (375g) | Bread flour creates a chewier texture |
| Salt | 1½ teaspoons | Sea salt or kosher salt recommended |
| Instant yeast | ½ teaspoon | Active dry yeast may also be used |
| Warm water | 1½ cups (360ml) | Around 100–110°F (40–45°C) |
| Fresh rosemary | 2 tablespoons | Finely chopped |
| Fresh thyme (optional) | 1 tablespoon | Adds extra herb flavor |
| Kalamata olives (optional) | ½ cup | Chopped |
| Parmesan cheese (optional) | ¼ cup | Freshly grated |
| Roasted garlic (optional) | 2 cloves | Mashed before mixing |
Instructions
Step 1: Prepare the Dough
In a large mixing bowl, combine flour, salt, instant yeast, and rosemary. Add warm water and stir until a sticky dough forms. Mix until no dry flour remains.
Step 2: Let the Dough Rise
Cover the bowl with plastic wrap or a clean towel. Leave at room temperature for 2–3 hours until doubled in size and bubbly.
For deeper flavor, refrigerate overnight after the first hour of rising.
Step 3: Shape the Dough
Transfer the dough onto a floured surface. Gently fold the edges inward to shape into a loose round loaf. Avoid overworking the dough.
Step 4: Second Proof
Place the dough on parchment paper and cover loosely. Allow it to rise again for 45–60 minutes until puffy.
Step 5: Heat the Dutch Oven
Place a Dutch oven with its lid inside the oven and preheat to 450°F (230°C) for about 30 minutes.
Step 6: Score and Bake
Carefully place the dough into the hot Dutch oven using the parchment paper. Score the top with a sharp blade or knife.
Cover and bake for 30 minutes. Remove the lid and continue baking for 10–15 minutes until deep golden brown.
Step 7: Cool Before Slicing
Transfer the bread to a wire rack and let cool completely for at least 1 hour before cutting.
Helpful Tips
- Use a kitchen scale for accurate flour measurement.
- Sticky dough is normal for artisan bread.
- The Dutch oven helps create a crisp bakery-style crust.
- Allowing the bread to cool fully improves texture.
- Toast leftover slices for incredible flavor.
Flavor Variations
Rosemary Olive Bread
Fold in chopped Kalamata olives before shaping.
Garlic Herb Bread
Mix roasted garlic into the dough for richer flavor.
Parmesan Rosemary Loaf
Add Parmesan cheese during mixing and sprinkle extra on top before baking.
Whole Wheat Herb Bread
Replace 1 cup of white flour with whole wheat flour and add 2 tablespoons extra water.
Serving Suggestions
- Olive oil and balsamic vinegar
- Butter with flaky sea salt
- Tomato soup or creamy soups
- Cheese boards
- Pasta dishes and roasted vegetables
Storage Instructions
Room Temperature
Store in a paper bag or wrapped in a towel for up to 2 days.
Freezing
Wrap tightly and freeze for up to 3 months.
Reheating
- Oven: 350°F for 8–10 minutes
- Toaster: For individual slices
- Air fryer: 350°F for 3–4 minutes